Learn how to sell digital downloads, license codes, event codes and any other digital product on your website with Google Sheets, PayPal and Google DrivePublished in: paypal – Google Drive
The web has made it incredibly easy for anyone to sell digital products directly to customers through websites, social media, and email newsletters. You can sell PDF ebooks, event tickets, MP3 music, photos, gift cards, software apps, license keys, coupon codes, website templates, fonts, graphics, video courses, and many more downloadable files.
While there are quite a few e-commerce platforms that help you sell digital products – Gumroad, E-junkie, Paddle, FastSpring, Shopify, Instamojo and WooCommerce, to name a few, here’s a do-it-yourself solution that will help you build your own online digital store in under 5 minutes using PayPal and your Google account.
Sell Digital Goods – The Workflow
Before we get into the implementation, here’s an overview of how the payment and digital delivery workflow works.
- Embed the “Buy Now” buttons into your website or blog.
- The buyer clicks the checkout button, enters their credit card details and completes the payment. The customer stays on your site and isn’t redirected anywhere to complete the purchase.
- The order is delivered to the customer from your Gmail in a personalized email message. You can also attach a tax invoice in the confirmation email.
You can head over to the live demo page and experience the 1-step checkout experience on your desktop or mobile phone.
To help creators during the COVID-19 crisis, we have made this product free.
Use the code COVID19 to unlock all premium features.
Sell Digital Downloads with PayPal and Google Drive
The workflow uses Google Drive for securely hosting files, PayPal for processing payments, Google Sheets for generating professional PDF invoices and Gmail for delivering the order to the buyer as file attachments.
There are no limitations on the size of files or the number of products that you can sell. There are no bandwidth or storage restrictions. There’s no transaction fee except for the payment processing fees that are charged directly by PayPal and Stripe.
Get Started Selling Digital Goods
Here’s a step-by-step video tutorial that explains how you can easily sell digital products with PayPal and Google Drive.
Step 1: Create a PayPal App
Go to developer.paypal.com and sign-in with your PayPal account. If you don’t have one, sign-up here for a new Business account.
Inside your PayPal developer dashboard, go to My Apps & Credentials, and create a new app under the Rest API Apps section. You can give your app any name as it is for internal use only. You need to create client credentials for both Sandbox and Live mode.
Step 2: Create a PayPal Webhook
When a buyer completes the purchase and makes the payment, PayPal will send your Google Sheets a notification by calling a specific URL and this is known as a webhook.
To create a webhook, go to digitalgoods.dev/copy and copy the Google Sheet to your Google Drive. Inside the sheet, go to Tools > Script Editor, then choose Publish > Deploy As Web App and click the Update button to create your PayPal webhook. Copy the URL to the clipboard.
You will have to authorize the script once since it has to do all the operations – send emails, attach Drive files, generate PDF invoices – on behalf of your Google Account.
Step 3: Configure App inside Google Sheet
Switch to the “Configuration” sheet inside the Google Spreadsheet and paste the webhook URL inside the “webhook” field. Next, copy-paste the Client ID and Secret generated in step 1 inside the corresponding fields of the Google Sheet.
<span class="gatsby-resp-image-background-image" style="padding-bottom:56.666666666666664%;position:relative;bottom:0;left:0;display:block"/>

</span></p><p>There are few other mandatory fields in the sheet. Choose your default currency, the shipping preference (whether you want to capture the address on the buyer), specify your brand name and the soft descriptor (this will show in the credit card statement of the buyer).</p><p>Go to the Digital Goods menu in the sheet (it is near the <em>Help</em> menu) and choose Test PayPal Configuration to verify if the PayPal and Google Sheets connection is working.</p><h3 id="step-4-add-your-digital-products" style="position:relative"><svg aria-hidden="true" focusable="false" height="16" version="1.1" viewbox="0 0 16 16" width="16"><path fill-rule="evenodd" d="M4 9h1v1H4c-1.5 0-3-1.69-3-3.5S2.55 3 4 3h4c1.45 0 3 1.69 3 3.5 0 1.41-.91 2.72-2 3.25V8.59c.58-.45 1-1.27 1-2.09C10 5.22 8.98 4 8 4H4c-.98 0-2 1.22-2 2.5S3 9 4 9zm9-3h-1v1h1c1 0 2 1.22 2 2.5S13.98 12 13 12H9c-.98 0-2-1.22-2-2.5 0-.83.42-1.64 1-2.09V6.25c-1.09.53-2 1.84-2 3.25C6 11.31 7.55 13 9 13h4c1.45 0 3-1.69 3-3.5S14.5 6 13 6z"/></svg>Step 4: Add your Digital Products</h3><p>Switch to the “Items” sheet and enter the default tax rate in the cell E1. Next, add one or more products in the sheet, one per row. You only need to specify the price of the item in column D, the Tax and Total Amount is automatically calculated based on the tax rate set in E1.</p><p><span class="gatsby-resp-image-wrapper" style="position:relative;display:block;margin-left:auto;margin-right:auto;max-width:720px">

<span class="gatsby-resp-image-background-image" style="padding-bottom:70.55555555555556%;position:relative;bottom:0;left:0;display:block"/>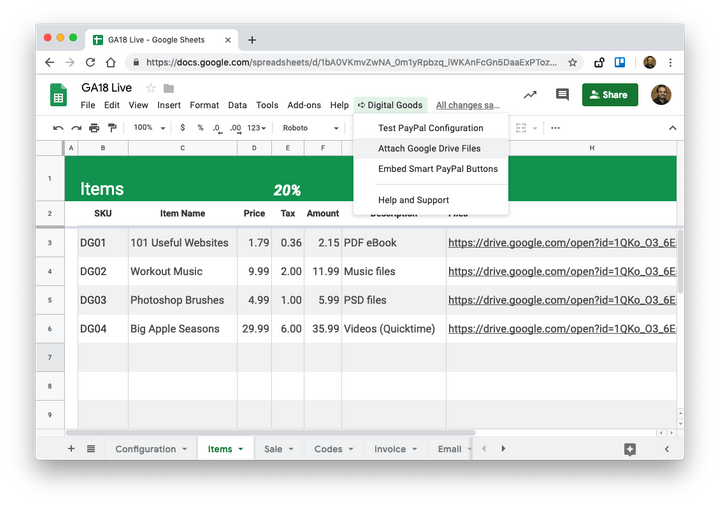
To attach files to your digital product, highlight the cell in the Files column, then go to the Digital Goods menu and choose Attach Drive Files. It opens the Google File picker and you can select one or more files from your Google Drive that will be sent to the buyer after they purchase the corresponding product.
Step 4: Create the Tax Invoice Template
Switch to the “Invoice” sheet and customize the invoice template. You can use formulas, add your logos, apply styles to match your brand and the template would be converted to a PDF file and sent as a file attachment in the order confirmation emails.
<span class="gatsby-resp-image-background-image" style="padding-bottom:99.44444444444443%;position:relative;bottom:0;left:0;display:block"/>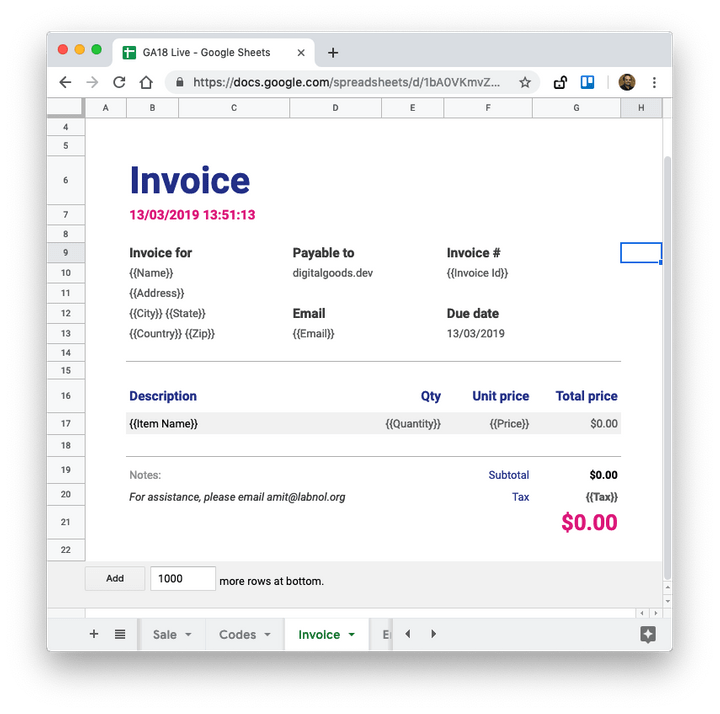
The invoice template can include place markers, similar to the ones you have used inside Document Studio. For instance, the {{Name}} variable will be replaced with the full name of the customer as found in the PayPal order. The {{Email}} variable is replaced with the buyer’s email address while the {{Invoice Id}} adds a unique invoice number to your invoice.
Step 5: Create the Order Confirmation Email
Switch to the “Email” sheet and create the HTML template that will be sent to customers after they complete the payment. The email will automatically include the files and PDF invoice as attachments but you can customize the email message and subject.
The first row in the sheet is the subject and everything else will go in the message body. The emails, like Mail Merge, can be personalized and you can also use HTML tags to add images, links and rich content in the emails.
Step 6: Test your PayPal buttons
Now that you have added the products to the Google Sheet, it is time to test the integration in sandbox mode before you embed the buttons on your live website.
Go back to your PayPal dashboard, and choose Credit Card Generator in the right sidebar under the Mock section. Here you can generate random credit card numbers with expiration date and CVV for testing your PayPal checkout buttons in sandbox mode.
Inside the Google Sheet, choose Digital Tools > Embed PayPal Buttons to generate the HTML embed code for your digital products. The screen offers embed codes in both the live and sandbox mode.
<span class="gatsby-resp-image-background-image" style="padding-bottom:81.11111111111111%;position:relative;bottom:0;left:0;display:block"/>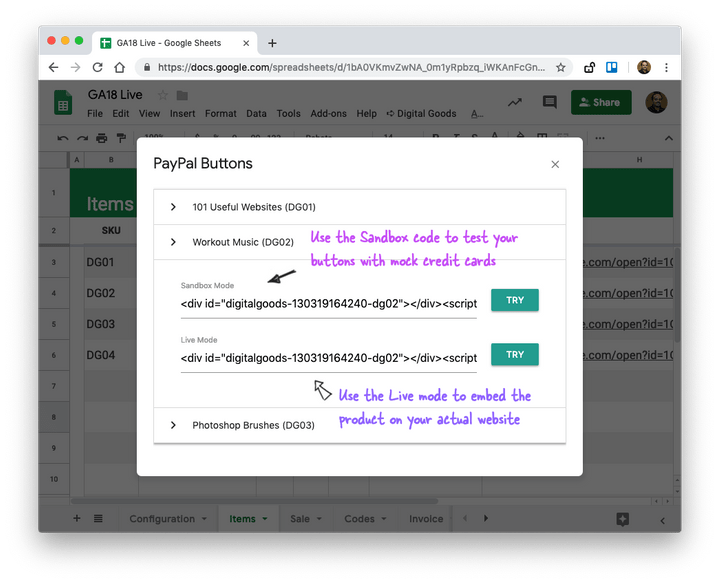
Click the Try button next to the Sandbox mode and you’ll be able to test the buttons right inside the Google Sheet. Click the credit card icon, enter the mock credit card number and click “Pay Now” to complete the test transaction.
PayPal invokes the Webhook and it triggers the order workflow. Switch to the “Logs” sheet and you’ll soon find a new entry for the transaction that you just completed. Open your Gmail Sent items folder and you’ll find a copy of the email that was just sent the buyer’s email.
If your integration is working as expected, go to the Embed PayPal menu in the sheet and this time copy the embed code for the “Live” mode and paste it on your website. Your product is now live and anyone in the world can buy your product with a single-step checkout.
Here’s a sample email that will go out to customers after the purchase.
<span class="gatsby-resp-image-background-image" style="padding-bottom:86.1111111111111%;position:relative;bottom:0;left:0;display:block"/>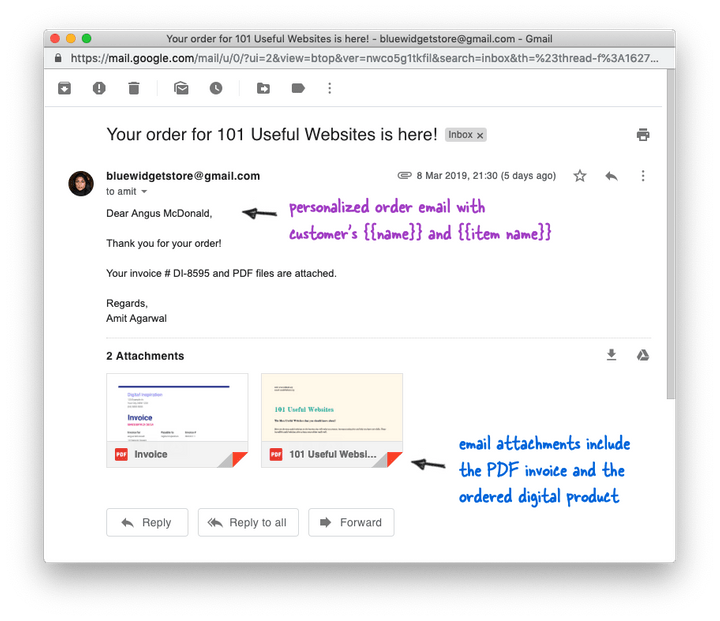
All the incoming orders can be tracked in real-time inside the “Sales” tab of the Google Sheet. The sheet includes the customer’s name, email address, the order summary, and the buyer’s postal address. The address is only available if you have set the shipping preference in the configuration sheet to “GET_FROM_FILE”.
You can directly run Mail Merge with Gmail inside this sheet to easily send product updates to existing customers. If you have been using PayPal before switching to Digital Goods, put all the PayPal emails under a new Gmail label, extract the email addresses inside the sheet and use that list for your merge.
How to Sell Unique License Keys & Codes
In some businesses, you may want to send unique codes to the customer. These may include license numbers to unlock software apps (like we do at Digital Inspiration), passwords to access streaming video courses, discount coupons, gift cards, event registration numbers and more.
<span class="gatsby-resp-image-background-image" style="padding-bottom:86.1111111111111%;position:relative;bottom:0;left:0;display:block"/>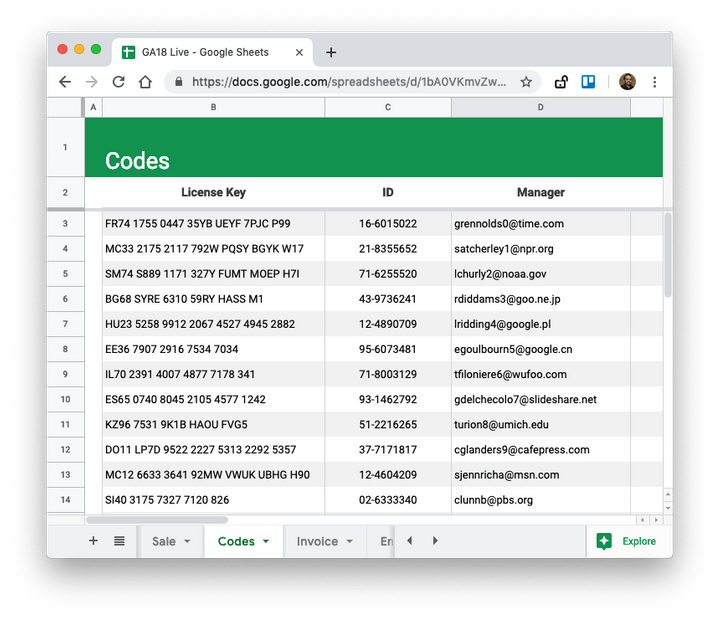
You can easily send unique license code with Digital Goods. Open the “Codes” sheet in the spreadsheet and put the pre-generated list of codes in one of the columns. Give this column a title as shown in the screenshot above. Next, include the {{column title}} in your email message and a unique code will be added in place of the marker.
Internally, the app looks at the last row of the Sale sheet (the current order), fetches the codes from that same row in the Codes sheet and adds them to your email and invoice.
Troubleshooting Tips
The video tutorial explains the entire workflow in great detail but if you are still facing any issues, here are some tips:
- Go to the configuration sheet and set “yes” for the debug setting. Next, do a test transaction inside the sandbox mode and check the Logs sheet for any errors.
- Go the Digital Goods menu and run Test Configuration again to ensure that your PayPal sandbox and live credentials are correct.
- PayPal, in rare cases, may delay the delivery of webhooks. Go to the PayPal dashboard and choose Webhooks (link) to get a list of recently-processed webhook events and their status. You can open a case at paypal-techsupport.com for help.
- Make sure that you have not renamed or deleted any of the original sheets in your copied Google Spreadsheet.
- Open your Chrome Dev Tools, switch to the Network tab and make sure that your adblockers are not blocking the PayPal script.
If you are unable to resolve the issue, ask your question at digitalinspiration.support.Sell Digital Goods

